This is a fortnightly newsletter about the New Zealand Net. If you would like to be notified by email when a new edition is published, please contact ZL1NZ.
Browse our newsletter archive.
Featured key
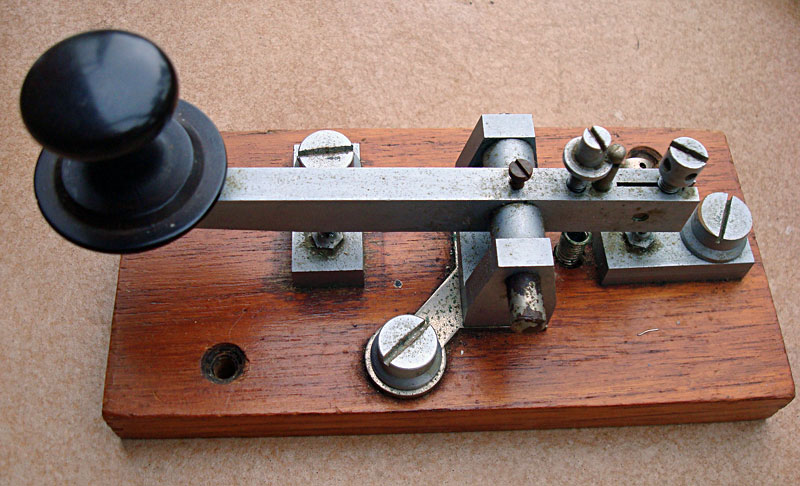
This key belonged to Bob Lyver, Radio Officer aboard Wahine when it sank in 1968. Photo: ZL2WT
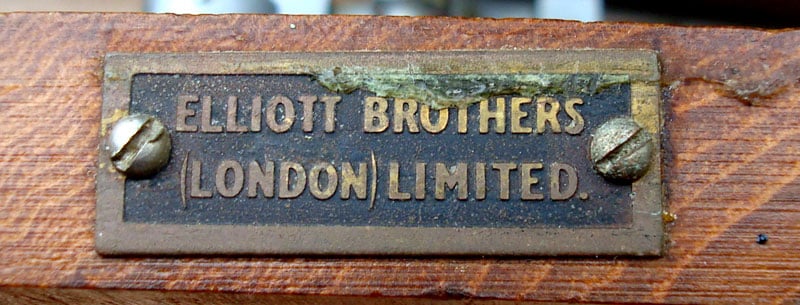
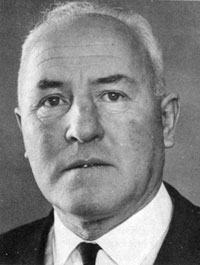 In the collection of David ZL2WT is this old marine key, made by Elliott Brothers of London. It is of special interest, as it belonged to Bob Lyver (pictured), Radio Officer aboard the ferry Wahine ZMGW when it sank in the approaches to Wellington Harbour in April 1968, leading to the loss of 53 lives.
(David has written an excellent article about the role of radio in the Wahine disaster.)
Here’s David’s description of the key:
“Similar Elliott keys can be seen in photos of other International Marine Radio Company (IMR) radio rooms – particularly photos of the radio installations aboard the rail ferries.
“The knob is similar to that used in the WW2 ‘bathtub’ RAF keys. I’ve seen the same style of knob on several British keys.
“The brass work has a grey plating, but the plate under the trunnion and the tapered pin did not receive the same surface plating. All the IMR keys that I’ve seen had similar plating, but I’ve never seen it on any of the Elliott keys that were used for land-line purposes.
“I obtained this key from retired R/O David Butler in January 2003.”
Tony Skilton, a shipmate of Bob Lyver in later years, recalls:
“Bob could happily key code with either hand, but his party trick, when he was wearing jandals, was to put the key on the deck and use his big toe!”
* If you have an interesting key you’d like to see featured in this spot, please send me a nice clear photo and a few words describing it.
Quick notes
High winds in parts of the country over the past few days brought down part of the 80m aerial at ZL2KE. Fortunately Steve was able to get it back in the air in time for his Net Control duties on Thursday the 21st. The Net must go on! 🙂
Interested in some faster CW? The NZ Net runs at 20wpm, which I think is a sensible speed for enabling the maximum number of operators to get involved. It also helps ensure that any formal traffic gets passed successfully with minimal fills required. But if you’re interested in some higher-speed operating, how about a casual “pre-Net” from 2050 to 2100 at 25wpm? I confess that I usually run into the shack just in time to get on the air at 2100, but I’ll make an effort to be there earlier over the next couple of weeks. Feel free to put out a CQ and we can have some quick ragchewing before slowing down a bit for the Net.
Photo flashback

Technician PD Graham with receivers at Makara Radio, near Wellington, c1947. In the centre are AWA dual-diversity receivers for telegraph, then to the right are two Marconi CSR5s for small ships radiotelephone and at the far right are two racks of RCA AR-88 triple-diversity receivers. Courtesy: Chris Underwood
Here’s a brain-teaser question. Do you know what Makara Radio had in common with the Featured Key in the previous newsletter?
Give up? The answer can be found here.
An easy-to-build resonant speaker for CW
An audio filter can really improve selectivity when copying CW signals. Some transceivers have audio peak filters built-in, plus there are several external units available, some of which even use DSP.
But if you are not using headphones, there’s an easier way to boost signals at your preferred audio frequency.
* * *

Small speaker (at left) glued to length of PVC pipe. Photo: WD4ERM
Want more volume when working CW? Make this simple resonant speaker. Materials: 2-inch speaker; 4-inch length of PVC pipe; speaker wire and appropriate plug; super glue.
Glue the speaker to one end of the pipe with only two drops of glue (you may want to remove the speaker later to make a different length tube). Attach the speaker wire and you are almost there.
Now tune the speaker to resonance. Make a tube from some heavy paper or from some flexible plastic. It should fit snugly inside the pipe and be no longer than the tube itself. You should be able to slide it in and out easily.
Plug the speaker into your radio, and produce a steady CW tone at your preferred pitch. Slide the insert in and out to get the maximum volume. When you pass through the point of resonance, you will notice a much enhanced sound.
You can either leave the insert in, and use the speaker as it is, or you can cut a new pipe to the exact length needed. Then you can attach the speaker permanently. You can be creative with a type of mount.
I have the Yaesu FT1000D and the speaker works similarly to the audio peak frequency circuit. It’s the same principle as as tuned pipe on a true pipe organ.
Morse musing: learning the code
Following an item in the last newsletter about the various ways people learn Morse, Gerard ZL2GVA was one of several readers to send me his recollections. Gerard’s story will be the first in a series called “How I Learned Morse Code.” Please send in yours too!
 In the Netherlands we like things to be neatly and officially organised, so ‘important’ things like Amateur Radio exams are done centrally and not too often! These days there are six exam dates per year, but when I did this it was only twice. So a fail meant waiting for another six months!
In 1992 I passed the theory exam and got my license to operate on VHF and above. As I was already interested in CW and it being a requirement to get a full license so I could get on HF, I started learning the code. I can’t quite remember the details, but recall using a computer program and also getting on-air (VHF) help from a friend. It was receiving only for quite a while, as sending was considered easy and I should be able to pick that up in a few weeks just before the exam.
All went well and I duly took a day off to do the exam in Utrecht (2-hour drive). The exam was two attempts of five minutes receiving at 12 wpm, with something like eight errors allowed (it was a ‘solid-copy’ style of exam). You had to pass at least one of the attempts, but we were only advised of the result after doing both.
If you managed that, you went on to do the sending part with a straight key allowed, again two attempts, but I can’t recall the duration. The judging of this was usually done by a number of experienced telegraph operators listening, and we sat this as a group, with the examiners listening in. We were told that hardly anyone ever failed this part, so were very surprised that we proved this wrong, as there were only about three out of our group of around 20 that made the grade!
 With no ability to protest or receive feedback, we were all left quite confused as what had happened to the ‘easy’ sending part.
So back to the ‘learning-board’ for another six months before we could have another go. Things went very differently this time, with the head examiner coming into the room after our first sending attempt to declare the exam over, and after a brief pause (not helping to reduce our confusion), announcing that everyone had passed!
Afterwards there were rumours that that year the sending examination had been done by computer for the first time, as opposed to human examiners. This explained much: first the almost complete failure for anyone to pass six months before (which had never happened), and then everyone passing after one attempt, which was also very unusual (as the examiners used to listen randomly across all candidates sending).
We deduced that the computer program had been set a bit too strict the first time, and it must have been relaxed a bit after that!
PS: I asked if anyone remembered this on a Dutch amateur radio forum, and got a few replies. Apparently the examination was already by computer quite a few years before – at least from the early 1980s with either a PDP-8 or PDP-11 computer. Someone even thought printed tape recordings were made. Still, the fact of the strange result remains, so perhaps this was a change in the system being used.
Pictured: Gerard doing some broadcast DXing with a portable receiver during a trip to Wales in the mid 1980s.
How did you learn CW? Drop me a line and I’ll post the replies in future newsletters.
Video (1979): Radio amateur signal interceptors
Location of TP4C?
The previous newsletter included a short clip of TP4C, an intruder on 7045 kHz. I couldn’t find any reference to that callsign via the usual online searches, but Paul VA3PAW came up with this:
“I found a post on a Chinese forum where a ham from Shanghai experimented with a DIY magloop antenna – and TP4C was the only station he could receive. So I suspect TP4C was local to him and so the naval base in Shanghai comes to mind.
“I heard TP4C on 7.045 on a Chinese SDR in Beijing around 10:30AM Bejing time (0230Z). As 40m is limited to 300-400 miles in daytime, it confirms the source is local to China.”
Net tip: QNO and QNT
You will be familiar with the signal QNX (you are excused from the net) which NCS sends to stations that are not required to remain on the frequency for traffic.
Here are two other Q signals that are good to keep in mind:
QNTx? – May I leave the net (for x minutes), e.g. QNT5?
If NCS agrees, they could reply with “C” or “QNT5”.
If a station has to leave the net, they can also do this without asking for permission from NCS:
QNO – I am leaving the net.
NCS would reply with “R”.
Suggestions?
If you have suggestions on how to make the NZ Net better, or things you’d like to see covered in these updates, please contact ZL1NZ. You might even like to write something for the newsletter.
Thanks for reading, and I hope to see you soon on the NZ Net!
—
Neil Sanderson ZL1NZ, Net Manager
New Zealand Net (NZ NET)
3535.0 kHz at 9pm NZT Mon-Fri